Monday, March 30, 2015

A Raspberry Pi Workshop at School

We had our Raspberry Pi Workshop today at our school. It was amazing to see the enthusiasm of the kids and the knowledge they already had about computers.

Here is what we discussed and demonstrated today in our workshop


As you know we are going to build a PC that costs less than 50 dollars. Before we dive in let us have a little background discussion on why we are looking at programming and the Raspberry Pi.


The Pi itself costs about 35 dollars. You can make a full fledged PC within minutes and the return on your investment is enormous. It opens the world of computer science and STEAM. It is possibly to play and learn about technologies used in the real world. 

The real investment that you will need to make is spend time discovering, experimenting, tinkering with this little device and do your own research to find out what people all over the world have been doing with it. 

This is our first STEAM career Fair. We want to focus on the term career and look at how the field of computer science (CS) can help us in having a successful career.

Here are some statistics. By the year 2020 there will be about Four Hundred Thousand CS students and 1.4 million CS career opportunities. As you see CS is America’s biggest untapped opportunity.

Exposure to CS leads to some of the best paying jobs. You will have a great life style, make good money, have a good and respectful job, have a good work-life balance.

Every one of us needs to learn to code. Coding is not just for students who want to become computer scientists. We are already using computers and smart devices in every facet of our lives. 

Irrespective of whether you choose a CS career or not, coding will give you valuable skills that will be useful in any career that you choose.

There is a term called computational thinking which computer scientists use to understand and solve problems using computers. From artists, to doctors to medical drug designers to stock market analysts and every other career you can think of will be using this basic foundational skill called computational thinking (CT)


According to Google for Education, “Specific computational thinking techniques include: problem decomposition, pattern recognition, pattern generalization to define abstractions or models, algorithm design, and data analysis and visualization”

Problem decomposition as the word says is breaking up a big problem into smaller parts and handling one problem at a time. For example in Maths you take small small steps to finally solve a big problem.

Pattern Recognition is to identify a pattern in the problem and create a general abstract model which can be used to represent the problem. For example in maths we use those x , y , z etc variables to generalize a problem

Algorithmic design is creating a recipe or steps to solve a problem without writing the actual code.

As you see these skill are applicable to any field you choose.

Now let us get to the actual reason why we are here, to build our PC and use it.

The PC we are going to build is called the Raspberry Pi. Why this name? Well Apple, Mango, Banana were taken and the creators decide to use Raspberry. And why Pi?

Did they have some fascination with the mathematical pi? Not really. Pi here is from the programming language called Python. Python is the language that is bundled or comes with the Pi. 

The same Python also comes bundled with all the Apple MAC computers. It is an easy to use and you can quickly start writing your programs.

Now the question would arise, we already have PCs , MACs, Apple Iphones, Ipads, Google Android devices, Xbox, PlayStation, Nintendo etc etc , then why do we need to build one more PC.

All these devices are closed boxes and we have no clue of what is inside these boxes. Even if one were to open it up and see all the electronic circuits and wires there is nothing we can really learn from it. They are proprietary and nothing can be changed, tinkered or experimented with. 

The moment you touch something inside it will most probably stop working and the warranty will also immediately expire and you know the side effect of that!.

We need something that is inexpensive and allows us to touch and feel it and allow us to tinker with it , experiment with it and make changes to how it works.

This is where the Raspberry Pi comes in. It is credit card size integrated circuit board that costs only 35 dollars and can be used to make a full-fledged Personal Computer that can be used to do so many things and use it as a starting point in your CS and STEAM career.

Let us look at some of the features of Raspberry Pi that make it a must have for all students


  • Small Form Factor. Thin and portable to fit in your pocket.
  • Inexpensive. Costs only 35 dollars
  •  Try to use peripherals that you already have at home to keep your costs low
  • Over a million plus sold
  • Education Oriented. Developed for Students to learn CS and STEAM in schools.
  • Open Source. It uses open source operating system and programs that anyone can make changes to. Mostly free of cost.
  •  Ideal for learners, makers, tinkerers , creators, experimenters, hackers …
  • Learn computer programming skills like Scratch, Python, C, Java, Ruby, Perl etc.
  • Learn basic electronic skill to make your own projects
  • Has all the basic tools used for fun, research productivity like a browser, you tube, media player, document, spreadsheets, presentations (libre office) etc.
  • Learn basic web technologies like HTML, CSS, Java Script, PHP
  • Learn about databases and structured query language
  • Setup your own web server to serve web pages
  • Talking about Math’s, Wolfram Mathematica is available on the pi for free. It is the technical computing environment for students and professionals.
  • You can create an entire Media Center that will play things like Netflix, Amazon media, MP3 , Radio Stations etc. in High Definition
  • Microsoft likes the idea of pi so much that they will be giving a free Windows 10 O.S for the pi to promote IOT.
And this list  continues to grow.

Now let us look at what is required to make a PC. What is inside a PC?

We require something that does whatever instructions we give or in other words processes them for us. This thing is called the CPU or Central Processing Unit. It takes the commands and with the help of its workers does the job for us. 

It use something Called RAM like a scratch pad to do its calculations and then writes into a permanent storage what we call a Hard Disk.  The Raspberry Pi does not have a hard disk drive. Instead we use a SD Card and load the operating systems and other programs onto the SD Card.

It is important to note that the CPU understands only the Binary Language. Binary language has only two numbers 0 and 1 . O can be considered as a switch that is OFF and 1 can be considered as a switch that is ON. Millions of transistors which act as switches are sandwiched inside the CPU chip and these execute the instructions that we provide. 

The pi has a Broadcom chip very similar to what is used in 

our mobile devices. This Chip is also called a System on Chip

We need something that we humans can use to make the CPU work for us using our English Language. This is called Operating System Software. 

The O.S allows us to take full benefit of the hardware and acts as an interface between us and the hardware.
We also need a Keyboard and Mouse as input devices and a monitor as an output device. We require a power source to power the PC.

The operating system that we will be using for our Raspberry Pi is called Linux. We will be using a O.S package called Kano (a flavor of Linux) which has been made specifically for kids like you to make you learning experience fun and easy.
It is time to get some hands on experience with the Pi. 

You can learn more about the Kano O.S from their web site and also download Kano on to a SD Card. The Kano web site is http://www.kano.me/
and the link to download the Kano O.S is 
http://www.kano.me/downloads
and the instructions to install it on to a SD Card are given 
here =>https://help.kano.me/hc/en-us/articles/201481812


We looked at some of these programs that come pre-loaded on the Kano O.S

Scratch
Python
Minecraft
Pong
Snake
Sonic Pi


Some of the the questions you had

From where can I purchase a Raspberry Pi ?

The Raspberry Pi can be purchased from the Newark Element 14 web site . Please get the latest Raspberry Pi
which is called Raspberry Pi 2 Model B 1GB

or you can purchase a Raspberry Pi Starter Pack from Amazon.com . The starter pack has all the things that you require to start using it immediately. It has the operating system pre-loaded so that you can start using it right away.

Please note that the O.S that comes preloaded is not the Kano O.S that you saw. You will have to install and configure Kano OS on your own. It is very easy and you can do it easily

You can also buy a full Kano Kit if you want which comes with all the hardware, software and manuals which makes the Raspberry Pi literally plug and play.  

There are so many flavors of Linux O.S, which should we use?

My advise, especially for beginners would be to start off with Kano O.S. Kano has made it extremely user friendly and once you register and create a profile , you get all sorts of badges , prizes, levels etc and they have a big online community to  share, communicate and collaborate with others just like you. They have created nice tutorials and wizards that walk you through all the steps. 

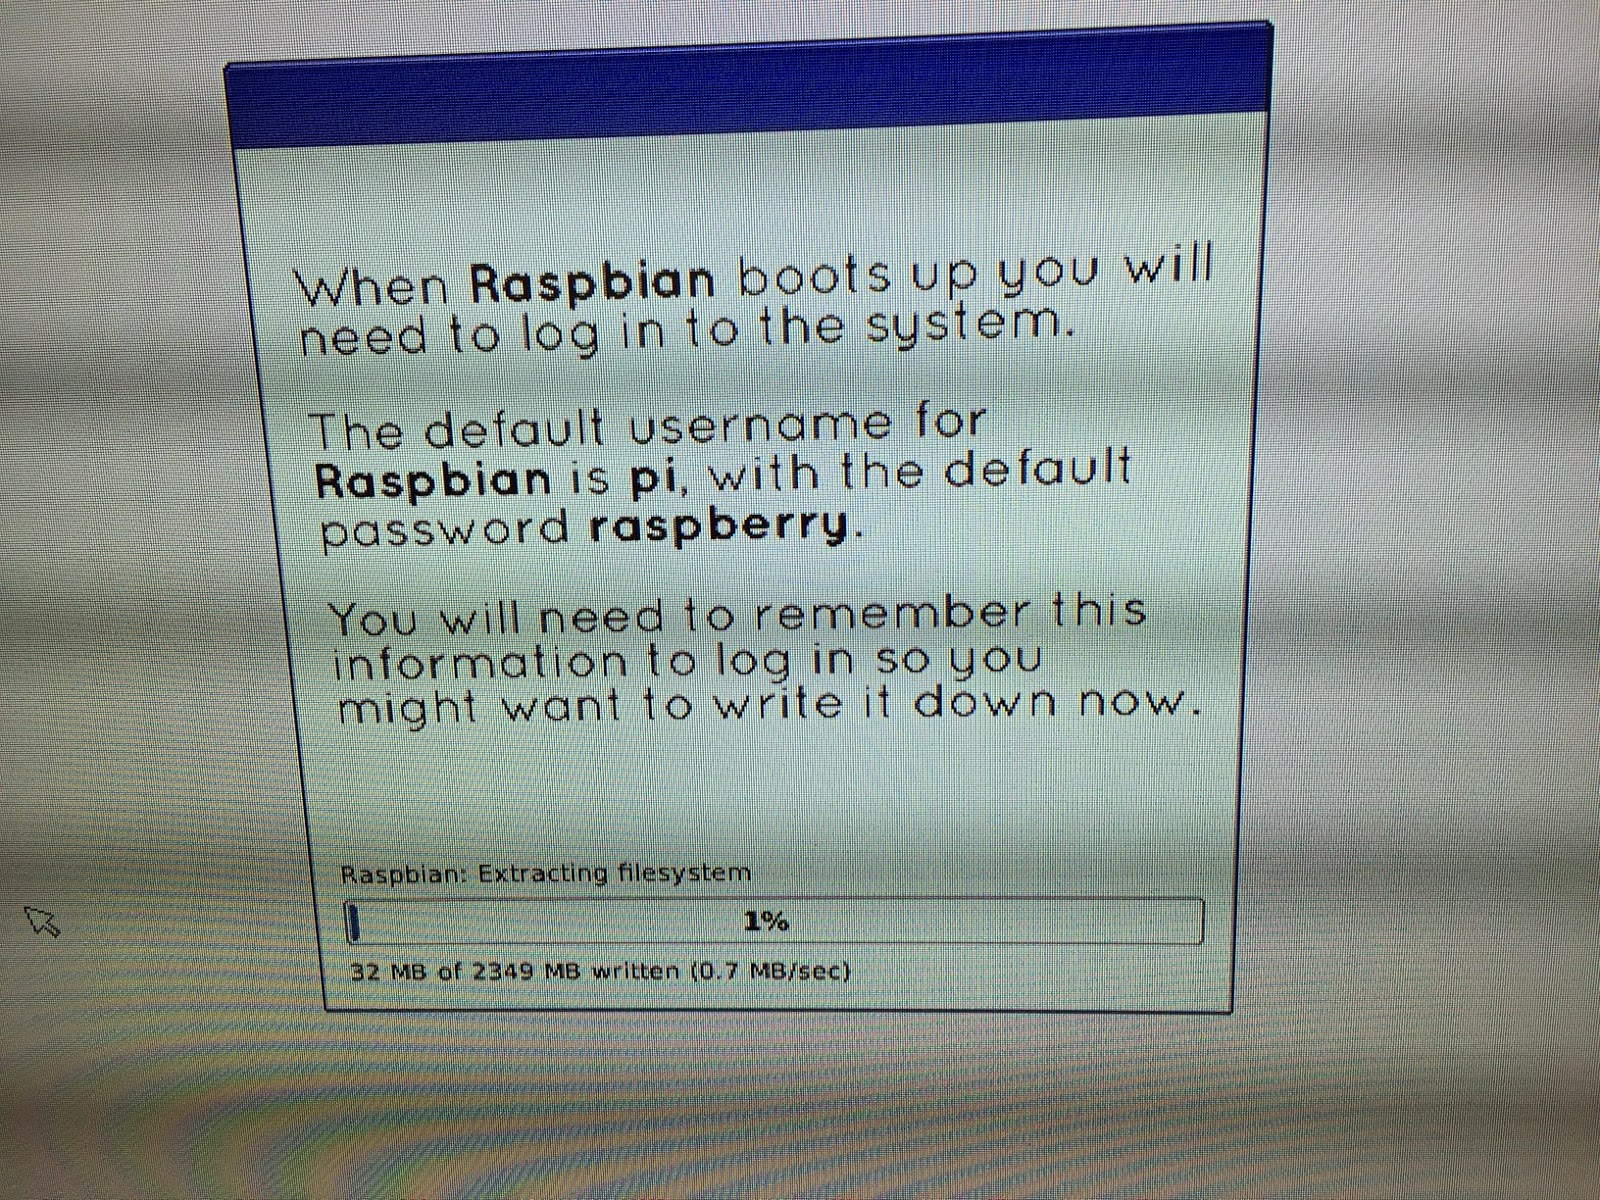
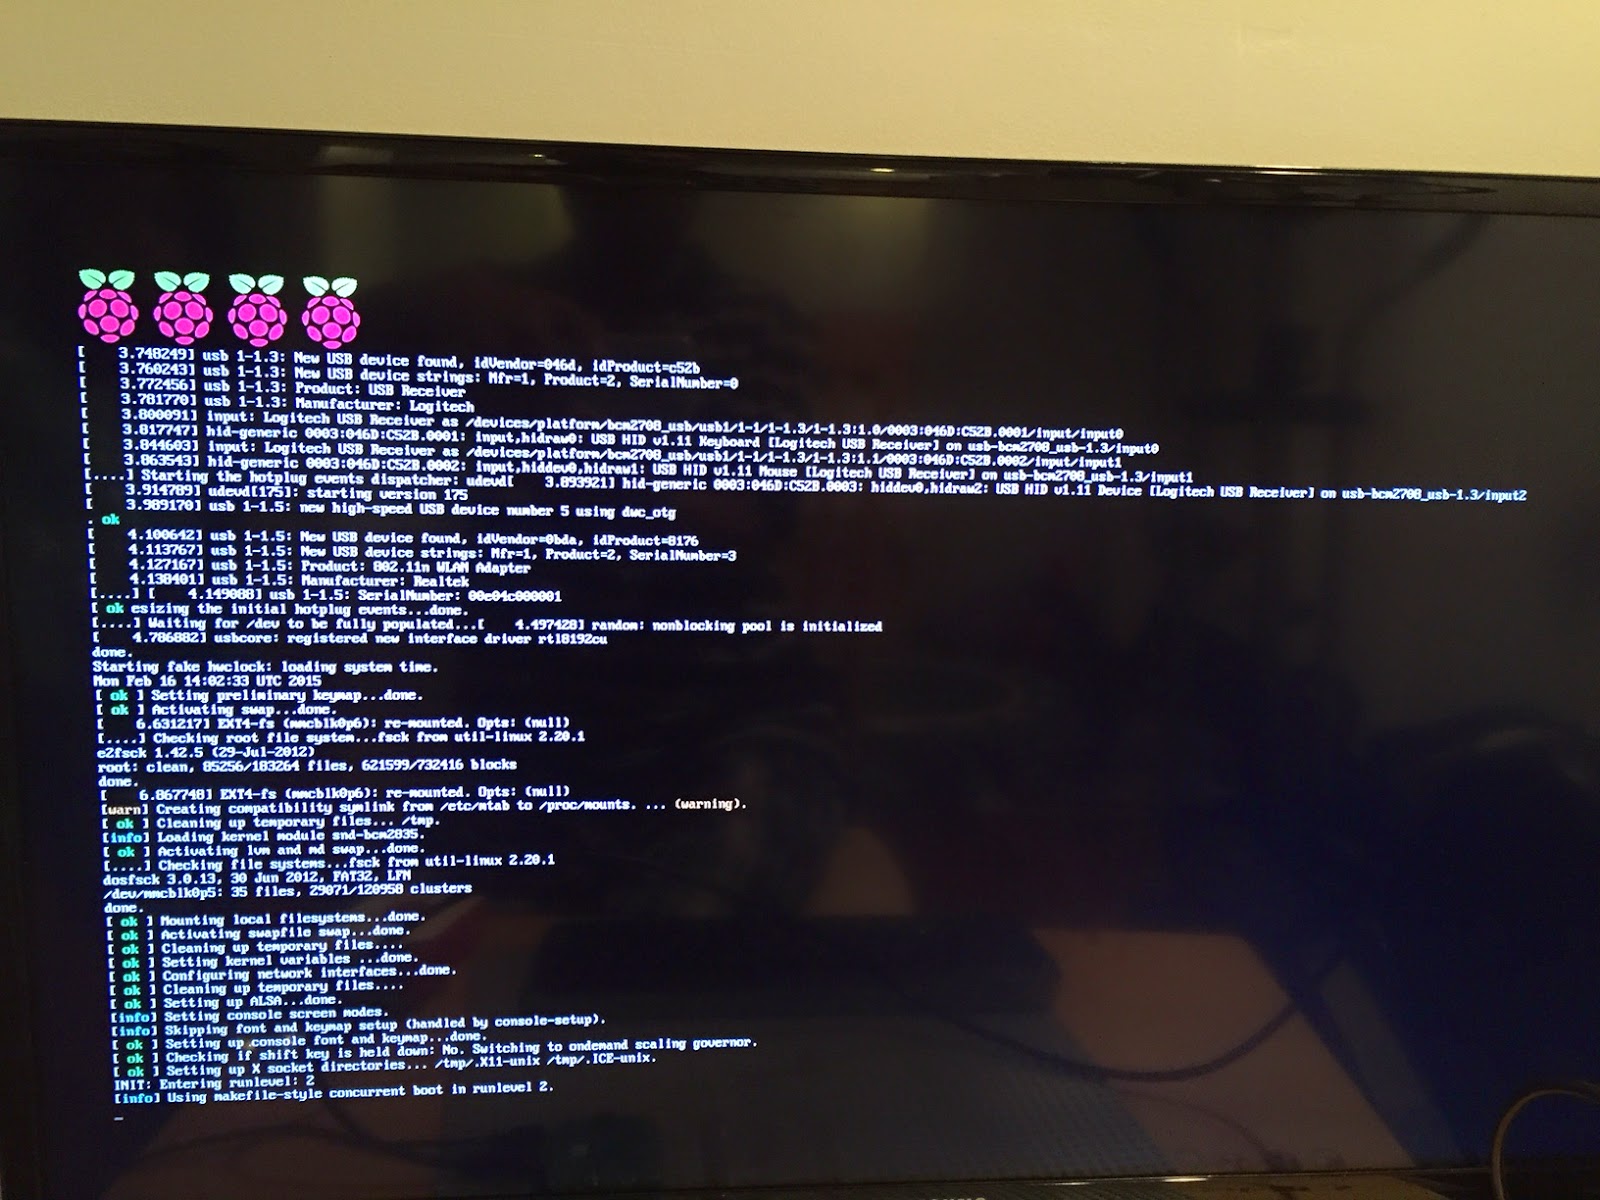
Once You have tried out all that Kano Offers and want to do more , you can then try out the Rasbian O.S . The good thing about Pi is that we use SD cards. With SD cards you can have multiple SD Cards , each with a different O.S and / or tools of your choice. This way you can retain your SD card that has Kano and have another one with Raspbian.

On the Raspberry Pi foundation web site they have several downloads available. Go with their recommendation and use the first one which is a out of the box installation called NOOBS installation and you get the Raspbian Linux O.S

Are their any resources for us to use for help

The best and easiest way is to do a Google search and you will get so many results for the Raspberry Pi.

Here are some web sites that I found useful

http://www.raspberrypi.org/resources/
http://www.kano.me/
The Pi Magazine=>http://www.raspberrypi.org/magpi/issues/
https://www.kidscodecs.com/raspberry-pi-projects/
http://csunplugged.org/books/
Awesome Book =>Adventures In Raspberry Pi
https://www.sparkfun.com/
https://learn.adafruit.com/category/raspberry-pi
http://makezine.com/
http://inventwithpython.com/


Friday, March 20, 2015

Installing and Configuring the Raspberry Pi Software, specifically the Operating System

Now that you know about the hardware or the brains behind the Raspberry Pi, we need to make it intelligent by loading an Operating system. The O.S gives us the capability to interact with the hardware and give instructions to make it work.

Once we give our inputs the Operating system receives it and converts it into instructions that the hardware can understand. Once the hardware processes it, he O.S receives back the solution or output and converts it back into something that we can understand.

We use plain English or any other human language or some music or video to work with. But the hardware does not understand any of this. Its language consists of only two digits , 0 and 1 also known as binary. The O.S does all this work of conversion back and forth and gives us the final product as output.

The O.S used on the Pi is called Linux. Linux is an open source operating system that is used to power many of the servers that we use like our web servers which we use nowadays to do all our day-to-day activities. From the International Space station to our mobile devices Linux is being used. By open source we mean that the program or code is available for everyone to see and modify. Linux O.S has not been developed by once person. Thousands of developers have come together to develop it. They continue to modify and enhance it capabilities.

As mentioned before Microsoft has announced that they will have a Pi version of Windows 10 Operating System and support to IoT revolution. IoT is that cluster of connected small devices that capture information and relay back the information for analysis and use.

Coming back to Linux, many flavors of Linux are available for the Pi. The Raspberry Pi foundation web site's download section has links to all the different O.S that are available. Based on your need you can download and install it. Installation instructions are also given. We will go through the installation steps in this document too.

There is one more Operating System package that has been developed especially for kids. It has a very nice Graphical User Interface with a lot of wizards and video tutorials that walk you through all the programs that are available. It makes the entire Linux Experience extremely welcoming and friendly.

This company called Kano has made it so simple and easy to build a PC and start using it. They have a Kano kit with the pi and all the components to make your PC up and running in matter of minutes.
Their Linux flavor of the OS is called Kano OS and is available from their download section. They have created an entire social community that supports their products. Kids get badges and other encouraging medals for their achievements.

Their kit which includes hardware is also very user friendly, especially for people who have never worked with hardware.I highly recommend the use of this kit for any beginner to this new platform. This company Kano is also interesting case study in understanding how a dream an idea can be turned into reality.

Getting back to Linux installation, let us look at the installation process.

Here are the 3 main steps

Download the Operating System Zipped File
Extract or Unzip the Image
Copy the extracted files to a formatted SD Card

The installation process is pretty straight forward. We can also get a pre-loaded SD card that already has the O.S installed.  You can look for it on Amazon.com. Here is a link to the pre-loaded O.S card.

Before you buy the pre-loaded SD Card give the installation process a try. You will need a PC with a SD card slot and an SD card. SD card with 8 GB is recommended.

First step is to download the O.S image to your PC. Go to the source =>http://www.raspberrypi.org/downloads/ and download the compressed O.S file. Follow the recommendations and suggestions offered on the download page.

If you are new and a beginner the recommendation is to download the NOOBS O.S . NOOBS stands for New Out of the Box Software. Download the zipped file to a folder on your PC.


Next Step is to extract the files in this compressed or zipped file. Double click on the file you just downloaded to extract it to a folder on your PC. Sometimes you may require a tool like WinRaR
to extract the files. Extract the files and make a note of the folder where you extracted the files.

Once the extraction has completed we need to write these files to the SD card.

We prepare the SD card by formatting the SD Card. Formatting wipes the SD card and configures the SD card so that files can be copied to it. A special formatting tool needs to be used to Format the SD card before copying the files.

Here is a link to the SD Card Formatter=>https://www.sdcard.org/downloads/formatter_4/index.html

Use the tool and format the drive and identify the new drive letter that is assigned to this SD card.

The final installation step is to copy paste or drag and drop all the extracted files from the folder on the PC to the newly formatted SD card. Please note that this will take a few minutes.

The complete installation help is available at the Raspberry Pi Foundation Web site. Here is the link ==>http://www.raspberrypi.org/help/noobs-setup/


Now that installation is complete we should try it out by connecting the pi to all the input and output devices ( keyboard, mouse , TV/Monitor) including the power adapter and inserting the prepared SD card into the SD Card slot and then powering the Pi ON.

As seen in the picture below, the Pi has been given all the connections to start it up.

A word of caution , please handle the Pi board gently. Don't try to push any of the cables and other accessories to hard. Also don't give it power till you have connected all the accessories. Don't make any hardware changes while the Pi is ON. As you know this Pi P.C or for that matter any computer should not be powered OFF abruptly. As far as possible you should try to have a graceful shutdown.


Another change from older versions of Pi and this new Pi 2 is the size of the SD Card slot

The size has reduced and you will need a corresponding Micro SD card with adapter. You can get this from Amazon.com

Please identify the direction and the notch on the SD Card slot and the SD card and then gently push it till it fits. To remove the card again give a gentle push and it will pop out


Once you have connected everything it is time to Power it ON and go through the initial configuration

The first screen you will see is something like this. Select the Raspbian Operating System
and also select the language and keyboard layout based on your regional preference and then hit Install to start the installation.


During installation some important information will be displayed on the screen . Make a note of it especially for the first time installer. Installation takes about 10-15 minutes.

Here is the information that you will see during installation


Two very important information that you should note down as shown in the screens below

the default user name and password are pi and raspberry respectively
from command line we start the GUI interface by using the command startx
the command raspi-config is used to start the program used to configure the Pi


Make a note of theses important instructions. They keep coming up in a loop. Installation takes a while. You can take a break and come back in about 15-20 minutes.

When you come back you will see this screen


Now that O.S has been installed successfully, it is time to do some minor tweaks and then launch the GUI or Graphical User Interface to start all the fun activities with your own Pi PC

Hit OK and the Core Linux O.S ( Kernel) and the different device driver software get loaded and you see a series of long text messages with lots of technical details.


After all this software gets loaded , what we also call as the booting process, the Raspbian Linux O.S
starts the Raspberry Pi Software Configuration tool or rsapi-config. When using this tool you won't have mouse control and will use the keyboard to navigate. Use the arrow keys and tab key to navigate and enter to select an option.


You can start this configuration tool any time by using the raspi-config command from the command prompt using the terminal.

At this point we will use option 4 ( Internationalization ) to setup our time zone information.

Once you select option 4, another menu will be presented where you will select the change time zone option.

Once this is done , you will get to the command line prompt

It shows pi@raspberrypi which means that your user name is pi and the host name or identifier of your PC is raspberrypi. Remember that for the default user pi the password is raspberry.

Type startx and hit the Enter key to start the Graphical User Interface


Wednesday, March 18, 2015

The amazing Raspberry Pi

I purchased the Raspberry Pi when it was initially launched but did not really use it. I did the basic configuration and checked out all the tools that are available and that's it. Did not touch it after that.

Sometime back my son's school announced a STEAM fair and I volunteered for it. While thinking about this it struck me that we could use the Pi to do some project. I tried to remember where I had kept the Pi Box. After some searching I found it in one of the boxes in the basement.

Dusted the dirt on the box and took out the credit card sized Pi and was amazed again at the human ingenuity of creating such tiny Integrated Circuits. What a way we have come from those large computers fitting in a big room to these ever shrinking chips and circuit boards that drive the smart devices of today.

Did a quick Google search on Raspberry Pi and found the link to the Raspberry Pi Foundation

This web site has all the information and resources required to get you started. This web site should be your starting point to know all about Pi. Here is a link to their introductory video about the Pi
What exactly is a Raspberry Pi

We can call Raspberry Pi the Swiss Army Knife for all STEM enthusiasts or a PC that can be built within 35 dollars using the Pi and existing accessories like keyboard , mouse , monitor etc which you may already be having. It is as mentioned credit card sized and can fit in your backpack.

Kids and even adults can learn a lot of things using the Pi.

Here is a list of some things that you can start off quickly start on the Pi

  • The Pi runs on Linux. Linux is the operating system . You will be learning the Linux O.S commands to control and manage all the tools on your Pi
  • Create Games, Animations, Stories and anything creative that comes to your mind using the very popular Scratch developed by M.I.T
  • Transition from block programming to actual coding using Python programming language.
  • Create Music using the Sonic Pi
  • Use the GPIO pins on the Raspberry Pi to learn electronics
  • Learn other programming languages like Ruby, C, Java , Perl etc
  • Learn the Basics of Web like HTML, CSS etc
  • Learn about Content Management Systems like WordPress, Drupal etc
  • A web Browser is available for all your web based research
  • You can play hi-def videos including videos from youtube
This is just a short list. There are so many programs and tools being developed for this platform.

The Pi is a tool for tinkerers, experimenters, makers, creators, hackers ....

and more importantly as Linus Torvalds ( the man behind the Linux Open Source movement)
puts it , it "affords failure". The low cost of pi gives us the opportunity to play and tinker and it is OK even if we break it.  

Building a PC that opens up so many learning opportunities at such a low price point , creates a level playing field for everyone.

I wish every kid and even adults interested in STEM should get a Raspberry Pi and give it a whirl.

You can purchase the Raspberry Pi from Element14 or get a Raspberry Pi Bundle from Amazon.com

In future articles we will look at the Raspberry Pi and all the tools and software in great detail

As I write this article, found out that Windows 10 will also be available on the pi for free sometime in the end of 2015. This shows the support for this platform and more importantly to the Maker revolution and the Internet of Things

Before I forget the new Raspberry Pi 2 is now available . It has quad or 4 times the processing power and the amount of RAM has been doubled making it to 1 GB of RAM making it more powerful. They have increased the number of USB ports from 2 to more making connectivity easier.I just got this new version from Amazon.com

I hope you found this article interesting and I am sure you will join the Pi adventure.

Thanks

RK from Little League Programmers


Raspberry Pi Hardware

Here are some pictures of the latest Raspberry Pi 2 Printed Circuit Board (PCB)

In this post we will look at the hardware in detail.

The processing capabilities or brain is provided by the CPU or processor.

In this case it is a a 900 MHz quad-core ARM CPU  (Central Processing Unit)

The 900 MHz represents the clock speed and it represents the number of instructions the CPU can perform in a given amount of time. This clock speed is one benchmark often used to compare CPU's

The quad core means the processing unit has 4 CPU's integrated into the same chip making it even more powerful.

Raspberry Pi  has 1 GB of RAM or Random Access Memory. RAM is like a blackboard or scratch pad which the CPU uses to load temporary programs and values. For example if the CPU were adding two numbers , it would use some location in memory to store the numbers and add them up and finally store the answer back in some location

But RAM is not meant for permanent storage. It only acts as temporary buffer space . RAM is volatile i.e; the contents will be lost once the PC is switched off.

For permanent storage , traditionally we use Hard Disk Drives. In case of the pi we use a SD Card (Secure Digital Card) to store information or data permanently. You may have seen SD Cards in Digital Cameras. Their is a Micro SD card slot on the Pi. Here you can insert a SD card. A 4 GB SD card can be used but a minimum of 8 GB SD card is recommended.

We need a keyboard and a mouse for input. On his version 2 of the Pi their are 4 USB ports.

We can connect a USB Keyboard and USB mouse using these USB ports. You can connect a USB WiFi adapter. This gives us wireless access to the Network/Internet.

To save space and less clutter you can buy a cheap wireless keyboard and mouse combo unit

In earlier models of the pi there were only 2 USB ports and two connect more than two USB devices we have to use a powered USB Hub to get more USB ports. This newer pi version has 4 ports and solves that problem.

It has one HDMI port. This HDMI output port allows us to connect to a HDMI TV or monitor and see what is happening on our PC made with this Raspberry Pi.

HDMI stands for High-Definition Multimedia Interface. All the new TVs and Monitors do have a HDMI port. You can connect the Raspberry Pi to a HDMI TV using a HDMI Cable.

It has a Ethernet port to connect the Pi to the network using a network cable. Generally we would connect one end of the Network cable to the Pi Ethernet port and connect the other end to a Ethernet port on your service providers modem or router.

However as mentioned , we can go the wireless way by connecting a USB WiFi adapter

Their is a Micro USB Power Source to power the Pi. The power source is like the one we use to charge our smart phones. It is recommended to use a power source or adapter that is made exclusively for the Pi rather that the cell phone charger due to current ratings.

It has a combined 3.5mm audio jack and composite video for connecting to speakers for audio and video output for older TVs

Their is a camera Interface to connect a camera and a display interface to connect a LCD display unit.

One important thing that is unique to Raspberry Pi are the GPIO pins, which is a dream come true for everyone interested in electronics. GPIO stands for General Purpose Input Output pins. As the name suggests these are Input Output pins. You can configure programatically what a pin does. Does it receive input or does it send out some output. For example you could connect a LED and control from a program when a output signal is sent to light up the LED. A GPIO pin could be programmed as a input pin and could trigger some action when input is received from a switch or any other device.


To summarize we need the following to build your personal PC using the Raspberry Pi:


  1. Raspberry Pi. Look for the Pi Board that has a high clock speed and with multiple processors or core. Raspberry Pi 2 is the latest and greatest that is currently available.
  2. Micro USB Power adapter to power the pi. A android phone adapter will fit but it is recommended to use a adapter that has been built for the pi due to current implications.
  3. USB Keyboard and USB mouse. You could use wired or wireless input devices. Recommend using a keyboard and mouse combo unit with wireless capability
  4. For output to see what's happening on the pi, we need a TV or Monitor that have a HDMI port.
  5. Also need a HDMI Cable to connect the Pi to your TV.
  6. For network connectivity using a cable or wire need a network cable. Make the network connectivity wireless by using a USB Wireless adapter
  7. For loading the operating system and other software we need a Micro SD card. 8 GB is recommended and it is goo to have a couple of SD cards.
  8. Speaker Set for sound output. If your TV set is able to give good sound output then you won't need the speaker set as the HDMI cable sends both audio and video from the Pi to the TV.

Other things that are useful
  • A Case to protect the Pi. I like a transparent case as we can see the the circuit board . It is more about the visual appeal and appreciating the engineering and human ingenuity in building this compact circuit board.
  • To load all the programs on to the Pi we need a PC or MAC that has a SD card slot.
Some other things which are not needed but make it more interesting are:
  • A pi camera that provides you the capability to take pictures and videos which is useful in many projects
  • A LCD touch screen panel for the Pi to have a display of its own.
The unique capability of the Pi is in the electronic projects that you can do with the Pi using the GPIO pins. Once you are ready to do electronic projects you will need electronic components like resistors, switches, transistors, capacitors, bread board etc. We will discuss this in detail in subsequent articles.

Electronic projects are done by many people using the very popular Audrino kits. The Pi adds the capability of not only creating electronic projects but also increased programming capability like for example sending out alerts and logs out. Google on Audrino to find out more about it.


Last but not the least we need your brilliant and inquisitive mind to build , use , learn and play with this PC that you will build.


 This Shows the Front of the Pi Board.


This shows the back of the Pi Board


This picture shows the different ports on the Side
This picture shows the ports available on the other side

A funner way to learn programming using Kano

The Kano kit makes building your own PC very easy and it is pretty much makes it plug and play.

The Kano team has taken the pi and made it much more sweeter. They have created an entire hardware kit that looks so good and compact. More importantly they have customized Linux and added programs and tools that specifically cater to the needs of kids and beginners.

The look and feel of the Graphical User Interface is breathtaking. They have taken the vanilla GUI and made it awesome. They use the block programming approach to learn programming using popular games like Pong and yes Minecraft. They us the same Pi as in Python as the underlying code and you can see the actual code that is being generated while you use the blocks to program your game.

You can buy a Kano Kit directly from their web site which is http://www.kano.me/

For kids and parents who want to kick start their programming experience the Kano kit is the way to go.

The good news is that Kano made their fabulous O.S , open source, which means it can be download from their web site for free. If you already have a Raspberry Pi , then load the Kano O.S on to it and experience Kano.

Instructions on how to install Kano are available on their web site. Here is the link
https://help.kano.me/hc/en-us/articles/201481812

Kano is definitely a good way to show kids and introduce them to Computer Science.