Once we give our inputs the Operating system receives it and converts it into instructions that the hardware can understand. Once the hardware processes it, he O.S receives back the solution or output and converts it back into something that we can understand.
We use plain English or any other human language or some music or video to work with. But the hardware does not understand any of this. Its language consists of only two digits , 0 and 1 also known as binary. The O.S does all this work of conversion back and forth and gives us the final product as output.
The O.S used on the Pi is called Linux. Linux is an open source operating system that is used to power many of the servers that we use like our web servers which we use nowadays to do all our day-to-day activities. From the International Space station to our mobile devices Linux is being used. By open source we mean that the program or code is available for everyone to see and modify. Linux O.S has not been developed by once person. Thousands of developers have come together to develop it. They continue to modify and enhance it capabilities.
As mentioned before Microsoft has announced that they will have a Pi version of Windows 10 Operating System and support to IoT revolution. IoT is that cluster of connected small devices that capture information and relay back the information for analysis and use.
Coming back to Linux, many flavors of Linux are available for the Pi. The Raspberry Pi foundation web site's download section has links to all the different O.S that are available. Based on your need you can download and install it. Installation instructions are also given. We will go through the installation steps in this document too.
There is one more Operating System package that has been developed especially for kids. It has a very nice Graphical User Interface with a lot of wizards and video tutorials that walk you through all the programs that are available. It makes the entire Linux Experience extremely welcoming and friendly.
This company called Kano has made it so simple and easy to build a PC and start using it. They have a Kano kit with the pi and all the components to make your PC up and running in matter of minutes.
Their Linux flavor of the OS is called Kano OS and is available from their download section. They have created an entire social community that supports their products. Kids get badges and other encouraging medals for their achievements.
Their kit which includes hardware is also very user friendly, especially for people who have never worked with hardware.I highly recommend the use of this kit for any beginner to this new platform. This company Kano is also interesting case study in understanding how a dream an idea can be turned into reality.
Getting back to Linux installation, let us look at the installation process.
Here are the 3 main steps
Download the Operating System Zipped File
Extract or Unzip the Image
Copy the extracted files to a formatted SD Card
The installation process is pretty straight forward. We can also get a pre-loaded SD card that already has the O.S installed. You can look for it on Amazon.com. Here is a link to the pre-loaded O.S card.
Before you buy the pre-loaded SD Card give the installation process a try. You will need a PC with a SD card slot and an SD card. SD card with 8 GB is recommended.
First step is to download the O.S image to your PC. Go to the source =>http://www.raspberrypi.org/downloads/ and download the compressed O.S file. Follow the recommendations and suggestions offered on the download page.
If you are new and a beginner the recommendation is to download the NOOBS O.S . NOOBS stands for New Out of the Box Software. Download the zipped file to a folder on your PC.
Next Step is to extract the files in this compressed or zipped file. Double click on the file you just downloaded to extract it to a folder on your PC. Sometimes you may require a tool like WinRaR
to extract the files. Extract the files and make a note of the folder where you extracted the files.
Once the extraction has completed we need to write these files to the SD card.
We prepare the SD card by formatting the SD Card. Formatting wipes the SD card and configures the SD card so that files can be copied to it. A special formatting tool needs to be used to Format the SD card before copying the files.
Here is a link to the SD Card Formatter=>https://www.sdcard.org/downloads/formatter_4/index.html
Use the tool and format the drive and identify the new drive letter that is assigned to this SD card.
The final installation step is to copy paste or drag and drop all the extracted files from the folder on the PC to the newly formatted SD card. Please note that this will take a few minutes.
The complete installation help is available at the Raspberry Pi Foundation Web site. Here is the link ==>http://www.raspberrypi.org/help/noobs-setup/
Now that installation is complete we should try it out by connecting the pi to all the input and output devices ( keyboard, mouse , TV/Monitor) including the power adapter and inserting the prepared SD card into the SD Card slot and then powering the Pi ON.
As seen in the picture below, the Pi has been given all the connections to start it up.
A word of caution , please handle the Pi board gently. Don't try to push any of the cables and other accessories to hard. Also don't give it power till you have connected all the accessories. Don't make any hardware changes while the Pi is ON. As you know this Pi P.C or for that matter any computer should not be powered OFF abruptly. As far as possible you should try to have a graceful shutdown.

Another change from older versions of Pi and this new Pi 2 is the size of the SD Card slot
The size has reduced and you will need a corresponding Micro SD card with adapter. You can get this from Amazon.com


Once you have connected everything it is time to Power it ON and go through the initial configuration
The first screen you will see is something like this. Select the Raspbian Operating System
and also select the language and keyboard layout based on your regional preference and then hit Install to start the installation.

During installation some important information will be displayed on the screen . Make a note of it especially for the first time installer. Installation takes about 10-15 minutes.
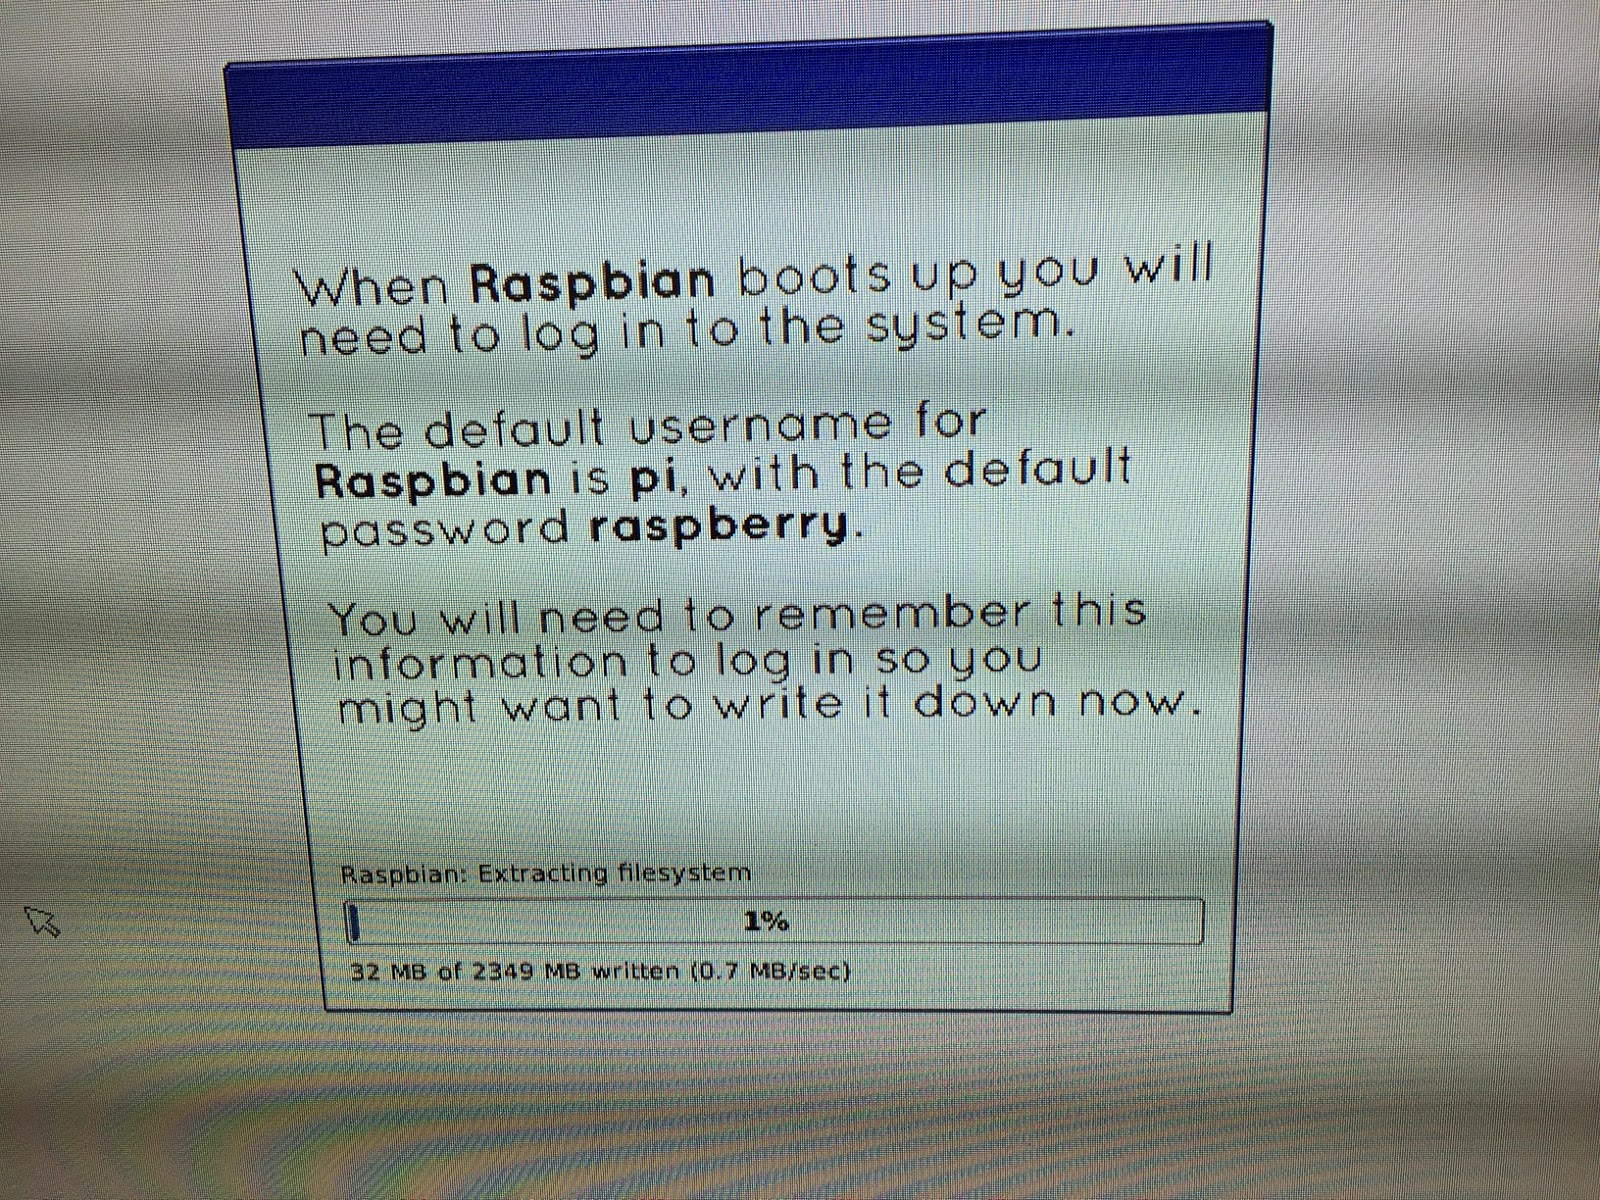
Here is the information that you will see during installation


Two very important information that you should note down as shown in the screens below
the default user name and password are pi and raspberry respectively
from command line we start the GUI interface by using the command startx
the command raspi-config is used to start the program used to configure the Pi


Make a note of theses important instructions. They keep coming up in a loop. Installation takes a while. You can take a break and come back in about 15-20 minutes.
When you come back you will see this screen

Now that O.S has been installed successfully, it is time to do some minor tweaks and then launch the GUI or Graphical User Interface to start all the fun activities with your own Pi PC
Hit OK and the Core Linux O.S ( Kernel) and the different device driver software get loaded and you see a series of long text messages with lots of technical details.
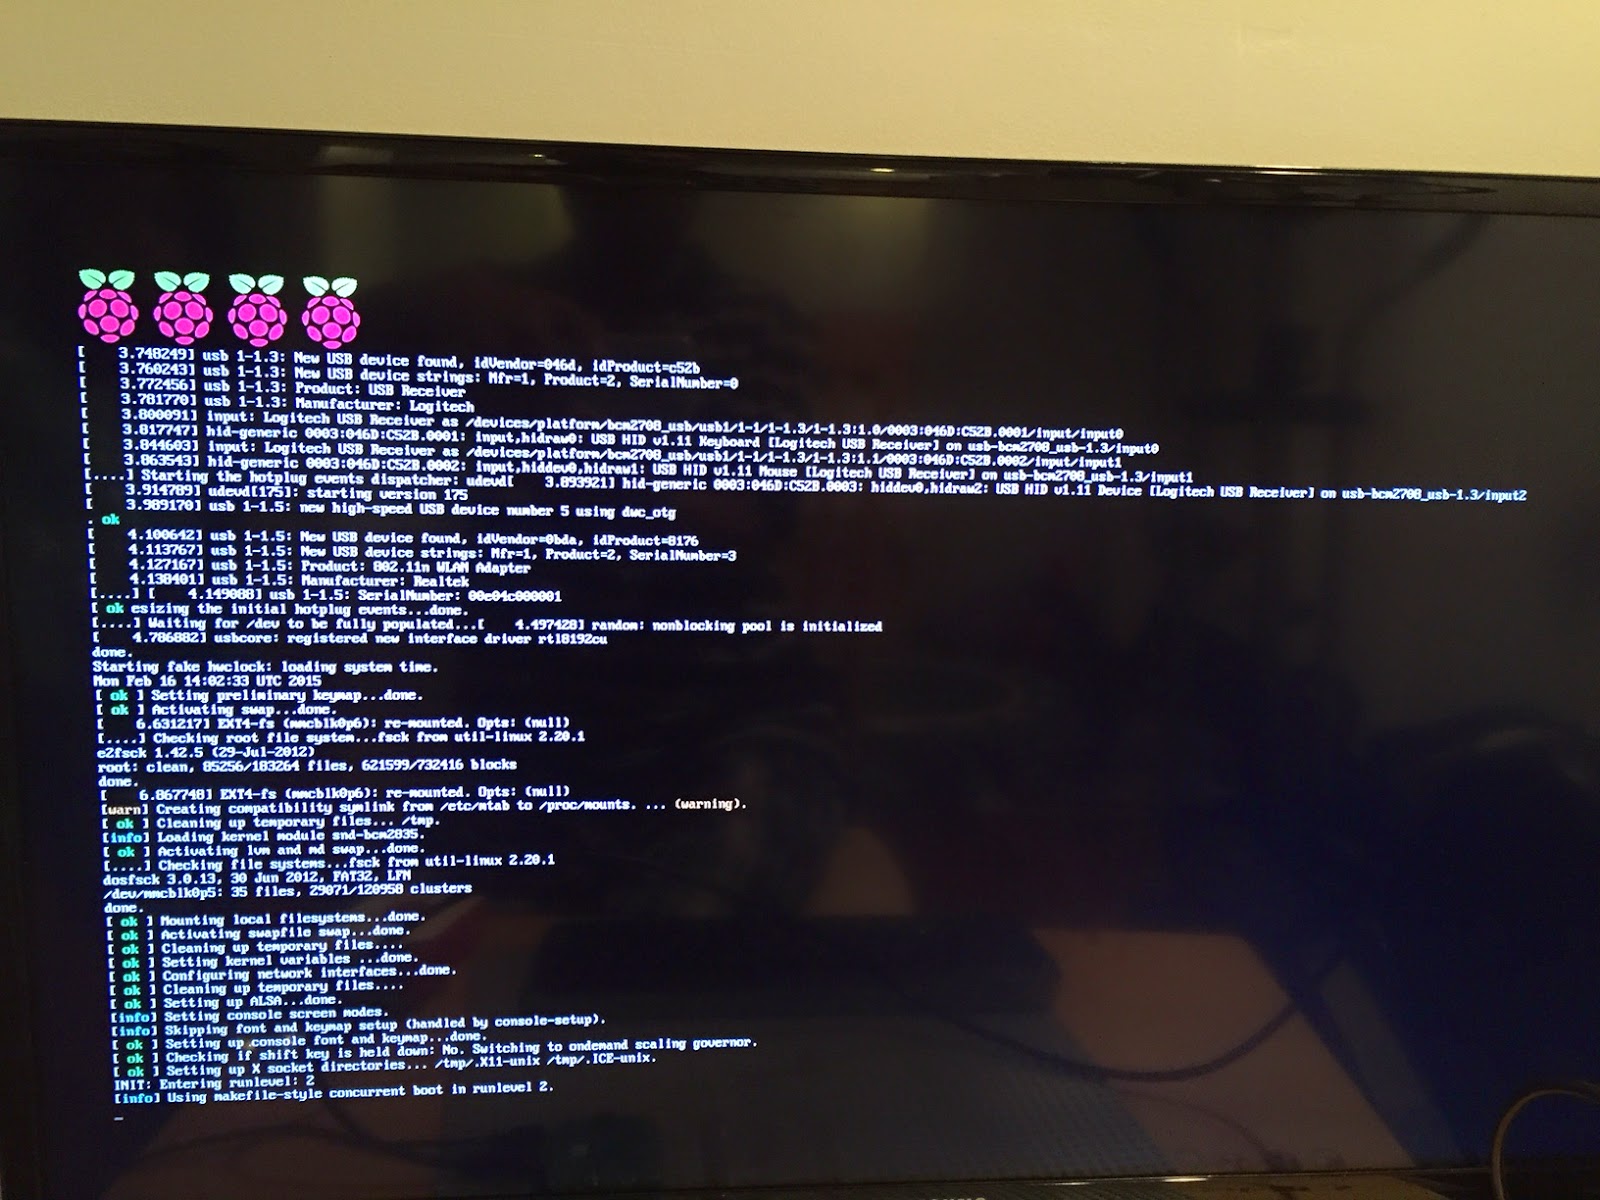
After all this software gets loaded , what we also call as the booting process, the Raspbian Linux O.S
starts the Raspberry Pi Software Configuration tool or rsapi-config. When using this tool you won't have mouse control and will use the keyboard to navigate. Use the arrow keys and tab key to navigate and enter to select an option.

You can start this configuration tool any time by using the raspi-config command from the command prompt using the terminal.
At this point we will use option 4 ( Internationalization ) to setup our time zone information.
Once you select option 4, another menu will be presented where you will select the change time zone option.
Once this is done , you will get to the command line prompt

It shows pi@raspberrypi which means that your user name is pi and the host name or identifier of your PC is raspberrypi. Remember that for the default user pi the password is raspberry.
Type startx and hit the Enter key to start the Graphical User Interface
No comments:
Post a Comment